I am so bad at keeping this blog current. I don't know why I even bother with the thing, except that it's a convenient way to show pictures of my finished objects, on the rare occasions when I have one, to my friends.
I was just looking at the goals I had posted for the year. I have crocheted a couple of baby blankets and I've made some hats for AR Children's Hospital, but I can't say I've done a tremendous amount of knitting. On the quilting side of my world I did finish a small quilt that is now serving as a table topper, and I've got another top basted and ready for quilting.
The big project at the moment is the quilt I decided to make during Lent instead of wasting my time with computer games. It's called Garden Delight and was a series quilt in Quilter's Newsletter last year. I had the advantage of seeing the finished quilt before I even started thinking about fabrics, so I could make my color choices with a bit of intelligence.There are six installments of directions, and there are six weeks in Lent, so I'm trying to finish one installment per week, but this first week is proving a bit of a bear. There are 52 blocks to make, each with 11 pieces, so it's slow going. I'm about 1/3 of the way through and the only good news is that I've figured out most of the ways I can do it wrong. I've also looked ahead to next week and it's a good deal easier, so maybe I can catch up then.
I'm also trying to figure out SeamedUp, the quilter's equivalent of Ravelry. I guess I've forgotten how much time I put into Ravelry when I first started with it.
Monday, February 27, 2012
Tuesday, December 06, 2011
2012 Knitting Goals
I worked these out a little over a week ago, but haven't taken the time to post them until now. Actual knitting takes precedence over projected knitting fantasies. This is what I have planned for the coming year:
Back to Christmas knitting. Less than 3 weeks to go.
- Finish the "iguana sweater." It's only called that because the color name is "iguana." It's a spring sweater, so having it done by the beginning of March would be good.
- Finish the Big Crocheted Blanket. I started this one last year as a stash buster, and it is definitely that. It's turning out huge and heavy, and I'm saving it for a snowy day when I will enjoy wrapping it around me as I work.
- Finish the Mitered Square Blanket. A perfectly good knitted blanket that I got bored it. It was on my UFO list for this year too. Time to get it done.
- Finish blankets that need sewing up. There are at least 6 sets of afghan squares stashed around the house. I want them gone. That means sewing them up. More good work for cold winter nights.
- Crochet linen sweater. Last summer I was looking for a light-weight sweater to wear over a tank top that was dressy enough for Sundays. I found a pattern. I found yarn. I just need to make the sweater. Projected completion by May 1.
- Make 4 pairs of socks for me. I have sock yarn that needs to be used. I need socks. Good summer knitting.
- Make 1 lace shawl for me. I have lace yarn and patterns and sometimes I like a piece of knitting that takes more skill and patience. Good for the warm summer months.
- Crochet 6 baby blankets to be given to charity. I need to use up stash, especially scraps. There's always a need for blankets somewhere.
- Stash reduction. Charity knitting should take care of this if I don't buy yarn unless I have a specific project for it. By the end of the year I don't want to have any more yarn in bins in the carport.
- Charity projects to be determined. In recent years it's been baby sweaters and hats. This year may bring a change to that. When I see what the need is, I'll figure out what I can do about it.
Back to Christmas knitting. Less than 3 weeks to go.
Tuesday, November 29, 2011
2012 Quilting Goals
The first Sunday of Advent has come and gone, which means the start of a new year in the Christian calendar. Since most of what I plan to knit or quilt this year is already finished or in the works for Christmas gift-giving, it's time to think about next year.
Next year looks like it's going to be a transition year for me, at least for the first half, so I'm being cautious about setting lofty goals. My main objective is to downsize the stash and the pile of UFO's. I realized as I looked over last year's goals that they were pretty vague, so I'm trying to be more specific this year, as well as realistic.
The two main goals are 1) to finish Devan and Theresa's double wedding ring quilt and 2) to make six baby quilts from scraps. The DWR is a major project, and may not actually get finished, but it should at least be in the quilting phase by the end of the year. I will probably visit Amy again this summer, and will first work at getting the top finished and the quilt basted in time to take it with me so we can work on it together. This seems to have become an annual event, and I'm looking forward to it. The baby quilts will be stashbusters and will also replenish my cache of quilts available for donation following a disaster.
The rest of the goals are steps toward moving projects from UFO boxes to finished quilts. They are 3) quilt and bind two already basted tops; 4) baste two already completed tops so they are ready for quilting; and 5) turn four unfinished tops into finished tops. I haven't chosen specific projects yet; I may do that at some point. My thought in breaking it down this way was to move things along without getting hooked into anything too big and time-consuming.
If I get this much done, I'll be happy. Next it's time to make knitting resolutions.
Tuesday, August 30, 2011
 I'm calling this little trio of baby quilts "Me, Myself and Irene." Hurricane Irene was making its merry way up the Eastern Seaboard this weekend while I was working at getting these quilted and bound, so in my mind they will always be Hurricane Quilts. The good news is that, while there was damage, this was not a major disaster, so I haven't seen a nation-wide call to action as there was after the spring tornados. I'll just hold these in waiting until they are needed and delight in the fact that I have something ready to offer.
I did have to make one alteration in the basic Super Nine Patch "recipe" because I failed to take note of where the fold was when I made my cuts and ended up with --- let's just say they weren't the sizes called for in the pattern. I still ended up with quilts that are easily big enough to cover a car seat or a newborn, and that's good enough. For the quilting I just did a diagonal grid in a red rayon thread and it looked quite good. I had tried some fancier options and just wasn't happy with the result; sometimes simpler is better.
Today was busy with work, and tomorrow looks to be as well. I'm going to knit a couple of rows and call it quits. Maybe I can squeeze in some time with yo-yo's tomorrow.
Saturday, August 27, 2011
It's been lovely to spend time in the studio today without being under a deadline to get a particular project finished. I've been working at clearing off the card table, which was set up to temporarily hold the pieces of the DWR and then became the catchall for everything that needed to be swept off the machine table.  On top of the pile was a Super 9 Patch crib quilt that I had started working on back in July and had botched and needed the able application of a seam ripper. I finished that one this morning, stitching down the last of the binding while the PBS sewing programs were on. Then I got the second quilt in the set of 3 layered and started its quilting. I'm not doing anything fancy with these, just a simple diagonal grid. This is the second one, and it's 3/4 quilted, so tomorrow I should get the binding sewn on and get the hand stitching at least started.
Then I started working on the lessons for the Quilt University class I signed up for hoping that it would exercise my hands and brain in different ways. The class is called Bodacious Blossoms and it's taught by Leslie Lacika; the objective is to learn different ways of making dimensional flowers. Along the way we are to create a sampler of different techniques and a mini quilt with flowers in a vase.

These two pictures are my first efforts at making a bell-shaped flower with a gathered neck. The one on the left is made from a more or less square piece of fabric and has the top edge pinked and left open. The one on the right is made from a more rectangular piece and has the top stitched down. I decided they also needed leaves, so played with different ways of accomplishing them as well. Both are fussy-cut from printed fabric, but the one on the left is appliqued with the edges needle-turned, while the one on the right is fused.
My hope is that by the time the class is done I will have a bigger arsenal of tools and techniques to use to finish the Spring wall-hanging. I really do want to get that one off my list before the end of the year; it's been there far too long. In the mean time, I'm just having fun thinking in terms of finishing simple crib quilts and making tiny sampler squares.
 On top of the pile was a Super 9 Patch crib quilt that I had started working on back in July and had botched and needed the able application of a seam ripper. I finished that one this morning, stitching down the last of the binding while the PBS sewing programs were on. Then I got the second quilt in the set of 3 layered and started its quilting. I'm not doing anything fancy with these, just a simple diagonal grid. This is the second one, and it's 3/4 quilted, so tomorrow I should get the binding sewn on and get the hand stitching at least started.
Then I started working on the lessons for the Quilt University class I signed up for hoping that it would exercise my hands and brain in different ways. The class is called Bodacious Blossoms and it's taught by Leslie Lacika; the objective is to learn different ways of making dimensional flowers. Along the way we are to create a sampler of different techniques and a mini quilt with flowers in a vase.


These two pictures are my first efforts at making a bell-shaped flower with a gathered neck. The one on the left is made from a more or less square piece of fabric and has the top edge pinked and left open. The one on the right is made from a more rectangular piece and has the top stitched down. I decided they also needed leaves, so played with different ways of accomplishing them as well. Both are fussy-cut from printed fabric, but the one on the left is appliqued with the edges needle-turned, while the one on the right is fused.
My hope is that by the time the class is done I will have a bigger arsenal of tools and techniques to use to finish the Spring wall-hanging. I really do want to get that one off my list before the end of the year; it's been there far too long. In the mean time, I'm just having fun thinking in terms of finishing simple crib quilts and making tiny sampler squares.
Wednesday, August 24, 2011
 It is finally finished. 2 years and 2 months after it's conception, the Double Wedding Ring for James and Crystal's wedding is finished. Mary Jane and I took the last stitches in it the day before I left to come home, gave it a loving bath, then folded it and presented it to the couple at dinner that night. It is now out of my life, except for a box full of leftover fabric that can now go back into stash, some lovely photographs and the memories of its making. Since I get to keep the memories, I think I got the best part of the deal in many ways.
I couldn't have pulled it off without the help of my friends. So many hands went into the production of this quilt. Mary Jane helped with the quilting, the piecing and the fabric selection. I am grateful beyond words for the times she responded to my calls of "Quilt emergency! Road trip!" with "I'll be there in 20 minutes. Do you want me to drive?" She spent a day learning the technique of paper piecing and set up the pieces for me to sew. And she has a few miles of thread in the quilting as well.
 Amy has a few miles of quilting thread in it as well. Two years in a row she gave up a week of her summer to let me and the quilt come and camp in her dining room. She fed me body and soul and kept telling me that I really could do it when I felt like I didn't have another stitch in me. And when I suggested at the end of this year's trek to Iowa that next year I should help her work on one of her quilts, she said she was ready to tackle the next DWR. Her quilting stitches are exquisite, and her friendship is more and more precious to me as time goes by.
 And in the final push to the finish, Rena added her wit and charm to the process. She, too, created a quilters' B&B and let Mary Jane and I take over her dining room table and her world for a few days. She took the unfinished quilt all over town to show it off to everyone she knew, unbelievably pleased to even see it, let alone have a part in its quilting.
And I can't leave out Shelly and Hunter. Shelly came to visit one afternoon while MJ and I were quilting. While she politely but firmly declined our offer of a needle and thimble, she was willing to pull basting threads. Because of her there were a lot less left to pull after the final stitch was taken. And Hunter, at age 2 1/2 was also allowed to pull a few carefully prepared basting threads. When he's an old man he can tell his grandchildren that he helped make his Mom and Dad's wedding quilt.
And finally, there is Randy. Randy took these lovely pictures and offered his own brand of support and encouragement to Mary Jane and I in the final push to the finish.
In the end, I love the quilt. Yes, it has it's flaws, and I take full ownership of them. But somehow the finished quilt glows with its own inner light. I would never exhibit it in a show, but I am prouder of this quilt than of some that have won blue ribbons. Maybe it's because I did it for love and not for my own gratification. Maybe it's because I know that it's recipients love it, and have been anxiously but patiently waiting to welcome it into their home; I still don't quite believe that Crystal painted their bedroom to match months before they had the quilt. Maybe it's because I can't think of anything I would have done differently, other than finding and fixing some of the flaws before I took it to the longarmer for basting. Okay, maybe a few things, but nothing that makes me love the quilt any less.
Yes, there is another DWR in the works, this one for Devan and Theresa's wedding, which was last summer. They may get it for Christmas 2012 or summer of 2013. I'm not going to do a lot with it between now and January. There are some smaller projects I want to finish first, and I need to give the studio a thorough cleaning. And I need to be able to look at it with fresh eyes and appreciate it for the thing of beauty I see it becoming. Right now I have a good set of quilter's callouses going, so I'm going to keep at the hand-quilting; there are a number of projects lined up waiting for me to put my stitches in them. And that's not even mentioning the fabrics and patterns I bought this summer on my travels. And the Quilt University class I signed up for that starts this weekend. And the serger I need to learn how to use. And Christmas is coming. Okay, now I need a nap.
Saturday, June 04, 2011
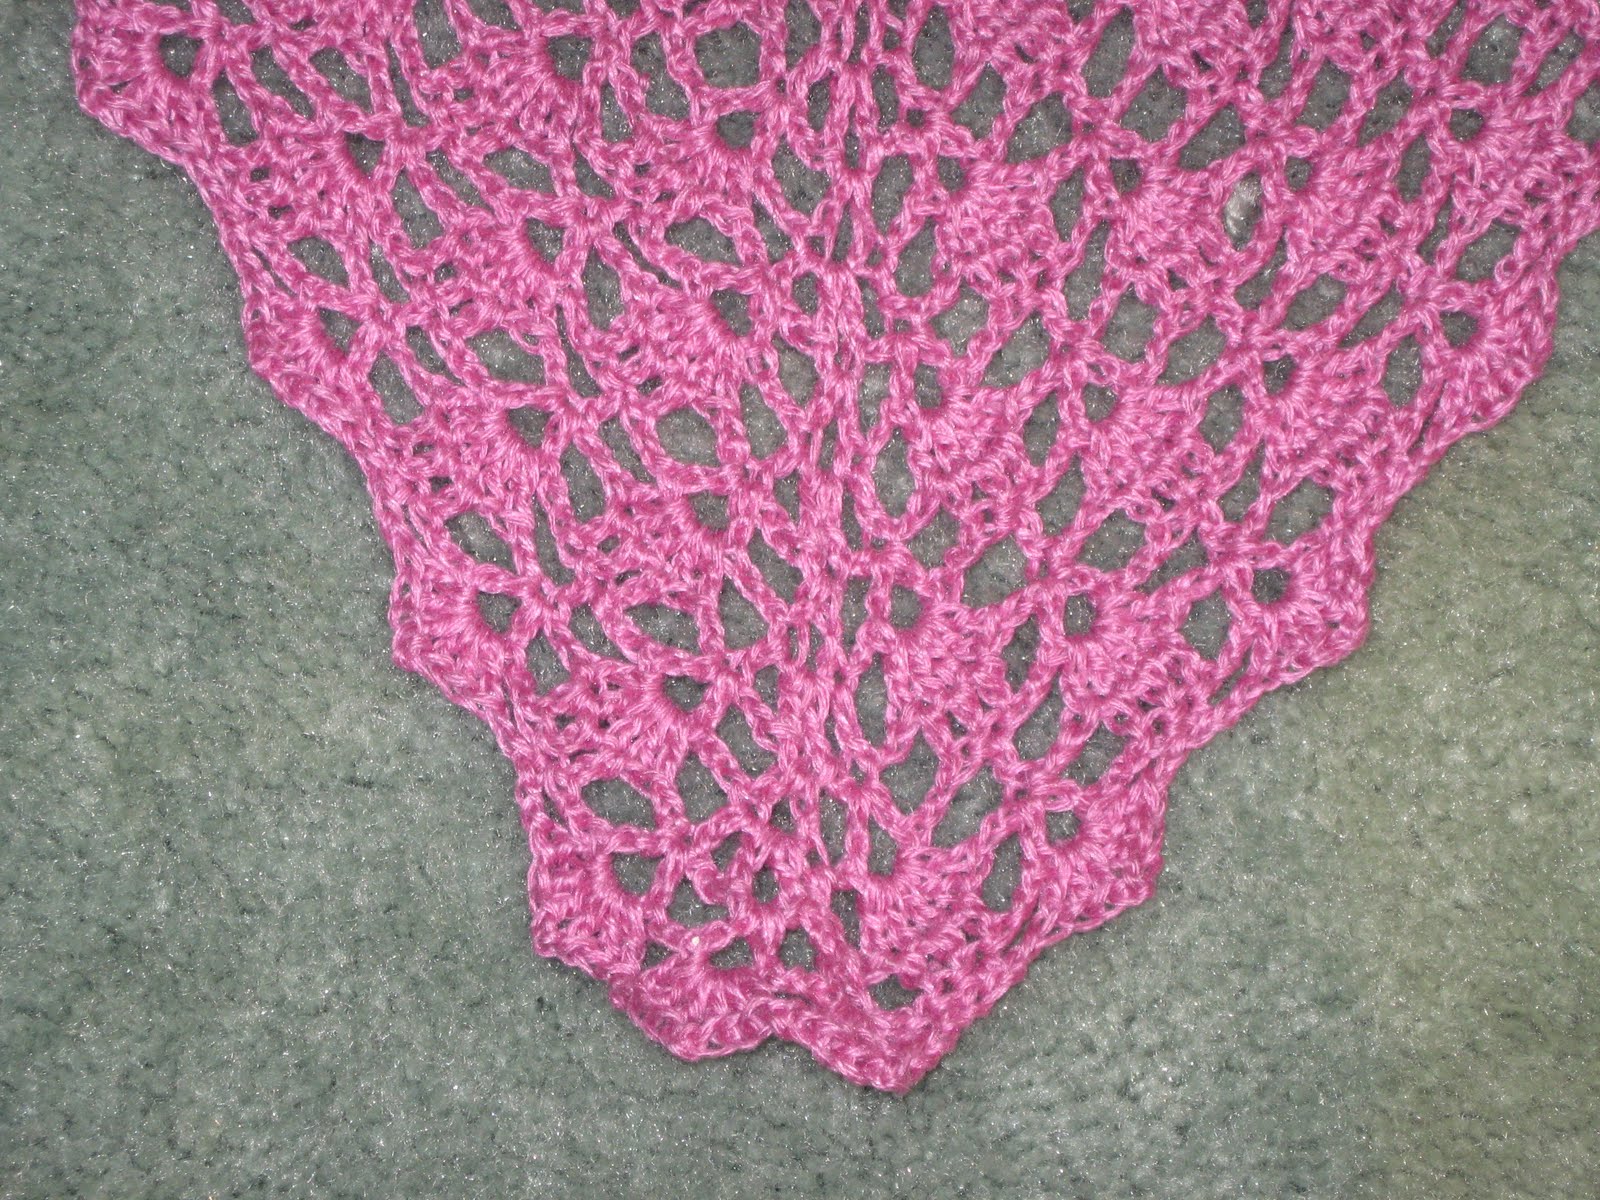
Today I finished a knitting - actually crochet - UFO that has been hanging on my project tree for about 2 years. The pattern is called "Wisteria Shawl," and it was one of the offerings for the Holiday Mystery Gifts Yahoo group a couple of years ago. I had some recycled silk yarn that I knew would be perfect for the project, but it just took time to get through all t hose stitches.

The yarn was indeed lovely for this shawl. It's very soft and drapey, and the finished shawl is perfect as a summer-time accessory or cover-up for when the air-conditioning is blowing on your back.
 hose stitches.

The yarn was indeed lovely for this shawl. It's very soft and drapey, and the finished shawl is perfect as a summer-time accessory or cover-up for when the air-conditioning is blowing on your back.
Sunday, May 29, 2011
I got the last row of stitching on the Yellow Brick Road this afternoon, and so it now officially counts as a finish as well. The colors are pretty tame by my usual standards, and the free-motion quilting is pretty much gosh-awful. But it has a soft flannel backing, and I hope it will bring someone comfort in spite of its shortcomings.


One thing I did that was new and different with this quilt was I tried a fusible batting. In the end I would say the review is mixed. The quilt feels stiff to me, in spite of its flannel backing. On the other hand, in spite of the fact that this quilt has languished unfinished for several years, the bonding held up pretty well; I did not need to rebaste the borders.
Once that was done, then I was casting about for the next project. I ironed the flannel I had planned for the back of the Disappearing 4-Patch, but when I measured, it wasn't quite large enough. I looked at John Flynn's method of making a backing with a diagonal seam, but that didn't seem to do the trick either. So I'll hunt for a different fabric the next time I'm in Monroe.
Then I got out the Super 9-Patch baby quilts and their prospective flannel backs, and that was the same deal - not quite large enough. So those ended up going back to the table as well. In the end I pulled out a quilt I had basted last summer that was made with blocks from a block swap. It, too, had been intended all along as a charity quilt, so it's time has come. It's all going to be straight-line quilting, mostly in the ditch, so I decided that would be the next project. I seem to be in quilt-it-and-finish-it mode, which is not the worst place to be. In the morning I'll look at thread options and get bobbins wound and all that good stuff.
Saturday, May 28, 2011
Today I finished the scrap quilt. This morning I did the final stitching of the binding by hand. And then I decided that since I had done the hard part of lining up the edges front and back in the process I might as well do the feather stitching anyway. So I did that too. And here are the final pictures of the front and the back.


Not all of the cross sashings are lined up perfectly. If this were to be a finer quilt I would probably have redone at least some sections of some seams. But the objective was to get it done, and done it is.
The part I really liked was sewing the label into the binding. With the help of the manual, I was able to remember how to do this with my machine; when I got the memory open, I found that I had done this before, about 10 years ago. All I had to do was change the date and location and I was good to go. This one is stitched in pink thread on the blue background so it's more obvious. Later in the day I did one in dark blue thread on medium blue fabric; that one is definitely more subtle. The best part was that once the binding was sewn down the quilt was done - completely done.

Since this quilt was finished well before lunch I decided that I wasn't done for the day. I swept the floor and tidied up a little, cleared the sewing table off completely and got out the Yellow Brick Road that I had started free-motion quilting a few years ago. I was not at all happy with the quality of my quilting, so I put it aside and went on to other things. I decided that if today was the day for finishing imperfect quilts, then today was its day. Except for one final row of decorative stitching it is completely finished. I won't take the pictures until that stitching is done, but it is also bound and labeled. When I pulled it out I realized it didn't have nearly as much quilting left to do as I had remembered; evidently I had decided at some point to only to the center in a free-motion squiggle. That gave me a chance to put the walking foot on and do some wavy lines in the borders; since that stitching shows more, I wanted something that I was more willing to have seen.
I decided to just put a solid binding on it, since every other part of it is pretty busy. I pulled out a blue piece from the bottom of the solids pile and discovered it had a Piece Goods Shop remnant tag on it dated 2-90. I suspect it of being a polyester blend, but I went ahead and used it anyway. I did the label the same way I did on the scrap quilt, so now that the binding is sewn down, it's labeled as well. I was tempted to plow on and do the last bit of decorative stitching, but decided it was late enough that I could royally mess something up, and I'd hate to do that at this point in the day. So I'll work on that tomorrow, then post some pictures.
At some point in the day Diane came to visit and I took her into the studio to show her what I have been working on. That's when I discovered that I've misplaced the Disappearing Four-Patch; I've looked through every pile on every table, and it's not there. So I'll have to hunt for that some more tomorrow as well. I may have a chance this week to go to Monroe and shop for backing for it, so it would be really nice to have it measured before then.
Anyway, it was a good day in the studio. I may not have gotten much churchy stuff done, but there's always tomorrow morning. And if there isn't tomorrow morning, it won't matter that I don't have it done anyway.
Friday, May 27, 2011
I've been working steadily on the scrap quilt; in fact I'm ready to sew down the free edge of the binding. I've decided to do that by hand, even though everything else is machine stitched, because I made my seam allowance a little skimpy and matching up the front and back would be a little tricky. If I had more fusible tape, I could do it, but I don't have enough to do the whole thing, so I'll just do it by hand tomorrow morning while the quilt shows are on. Besides, it will give me a little prayer time which needs to go with this quilt, since it will go to someone who has been through the trauma of a tornado.
After I finished sewing on the binding tonight, I decided I needed to get the table cleared off for the next big job, which is the binding on the double wedding ring. On one corner of the table were some blocks for a tesselated flower quilt that I'm contemplating, so I decided to do a little more sewing and have a bigger sample of both versions, so that I can hopefully make a decision about which to use.
I should have pictures of the scrap quilt tomorrow. Meanwhile I'm off to watch one of my favorite moves - Men in Black.
After I finished sewing on the binding tonight, I decided I needed to get the table cleared off for the next big job, which is the binding on the double wedding ring. On one corner of the table were some blocks for a tesselated flower quilt that I'm contemplating, so I decided to do a little more sewing and have a bigger sample of both versions, so that I can hopefully make a decision about which to use.


Both samples start with a 3-inch square. The one on the right has triangles made from 1.5-inch squares. The one on the right has triangles made from 2-inch squares. The problem is that I can't make up my mind which is better. In fact, I'm not sure I'm happy with either one of them, but going to a 1.75-inch square seems ridiculous. The triangles on the left seem too big, and the ones on the right seem too small. So I'll leave the two samples on the design wall for a while and stare at them.
I should have pictures of the scrap quilt tomorrow. Meanwhile I'm off to watch one of my favorite moves - Men in Black.
Monday, May 23, 2011
Today I had a chance to spend some quality time in the studio and finished a set of scrap blocks, so I thought this would be a good time to post pictures and a tutorial of sorts.
The first step was cutting backing and batting squares. I had started with some 9-inch squares from another project, and that turned out to be a good size to work with, so I started cutting more of my larger scraps to that size. The batting is also scraps left over from other quilts, and I cut it closer to 10 inches square. The block begins with a backing square turned wrong side up, and a batting square laid across the top of it:
Then comes the fun part - digging into the bin of scraps and pulling out the first strips. This scrap bin has been going for quite a while, and I had great fun digging down to the bottom to see what treasures were buried down there and then trying to remember what quilt(s) I had used that fabric in. I started with a strip near the center, right side up, then pinned another strip to it, right side down, and stitched thru both strips, the batting, and the backing, thus quilting all the layers together as I stitched the strips together.
  Using the sew-and-flip method I worked my way across half the block, then did the same for the other half. I lengthened my stitch just a bit to a 3.0 mm and used a thread that would be appealing on all the fabrics used in the back; in this case, lime green.
When I was done, I had a block that looked like this.

The next step was to run a narrow zig-zag all around the outside edge of the block. I used a 1.0 mm width and a stitch length of 3.0 mm. With the right toe of the open-toe foot right up against the edge of the fabric, I moved the needle over to the right so that the stitching was right on the edge of the backing fabric. This step accomplishes a couple of things. One is to get those corner pieces, which otherwise want to
flop around and be uncooperative, firmly sewn down. The other is that it compresses the seam allowance, which will make doing the sashing easier.
Then it was time to trim and square up the squares:

I found when I went to do this that my block was now slightly smaller than 9 inches because the stitching had caused it to draw up just a little. Since I was only concerned that the blocks be the same size, and not that they be exactly 9 inches, I just trimmed them to 8 3/4 and was happy with that. If the exact size mattered in a project, I would start with a background square about half an inch larger than that size.
A couple of times when I was digging through the scraps I came across strip sets left over from some other project. I just treated them the same as if they were a single fabric and worked them right in. I even found some orphan blocks that I sewed together into a strip and incorporated. And if I had a piece of fabric I wanted in the center of the block but it wasn't long enough, I sewed another fabric to it and created a custom strip. The only thing I was careful about was making sure the very last strip in the corner wasn't too narrow; I didn't want a lot of seam bulk in that place, or a piece of fabric that was too small to really be seen once the sashing was added to the final blocks.

Once I had the 20 blocks I needed for the quilt finished I put them up on the design wall and laid them out in a pattern. Then I did a "background check." I turned each block over in place on the wall, so that I could see how all the different backing fabrics related to each other. I didn't want two pieces nearly the same color adjacent to each other, and I didn't want obvious directional fabrics turned sideways. I made the changes I wanted, then turned the blocks to the front again, rotating blocks as needed to recreate my original design.
Now I'm in the process of adding the sashing. I'm using the technique Sharon Pederson outlines in her book Reversible Quilts: Two at a Time, so I won't show all the steps. Here is the top row of the quilt with all the sashing strips machine stitched in place. All that's left is to hand stitch the free edge down. Since this is to be a charity quilt, and I'm interested in getting it finished (as well as pretty), I may opt for a machine zig-zag or other decorative stitch instead.

I have learned several things in the process of making this quilt. One is that I need another scrap bin for my more "mature" fabrics, the ones with more subtle colors. I have pulled several pieces out as I have worked my way through this quilt that just don't play well with this bright color palette. They will find their way into other types of quilts. I have also learned that I really like making this type of quilt. The blocks are like potato chips; you just have to have one more. And the best part is that I don't end up with yet another unquilted top to deal with; once it's assembled it's ready to be bound and done. And since my scrap bin is clearly overflowing, I know there will be more of these quilts made before the summer is over. Especially since the tornadoes seem to keep coming.
The first step was cutting backing and batting squares.
 I had started with some 9-inch squares from another project, and that turned out to be a good size to work with, so I started cutting more of my larger scraps to that size. The batting is also scraps left over from other quilts, and I cut it closer to 10 inches square. The block begins with a backing square turned wrong side up, and a batting square laid across the top of it:
Then comes the fun part - digging into the bin of scraps and pulling out the first strips.
 This scrap bin has been going for quite a while, and I had great fun digging down to the bottom to see what treasures were buried down there and then trying to remember what quilt(s) I had used that fabric in. I started with a strip near the center, right side up, then pinned another strip to it, right side down, and stitched thru both strips, the batting, and the backing, thus quilting all the layers together as I stitched the strips together.
  Using the sew-and-flip method I worked my way across half the block, then did the same for the other half. I lengthened my stitch just a bit to a 3.0 mm and used a thread that would be appealing on all the fabrics used in the back; in this case, lime green.
When I was done, I had a block that looked like this.

The next step was to run a narrow zig-zag all around the outside edge of the block.
 I used a 1.0 mm width and a stitch length of 3.0 mm. With the right toe of the open-toe foot right up against the edge of the fabric, I moved the needle over to the right so that the stitching was right on the edge of the backing fabric. This step accomplishes a couple of things. One is to get those corner pieces, which otherwise want to
flop around and be uncooperative, firmly sewn down. The other is that it compresses the seam allowance, which will make doing the sashing easier.
Then it was time to trim and square up the squares:

I found when I went to do this that my block was now slightly smaller than 9 inches because the stitching had caused it to draw up just a little. Since I was only concerned that the blocks be the same size, and not that they be exactly 9 inches, I just trimmed them to 8 3/4 and was happy with that. If the exact size mattered in a project, I would start with a background square about half an inch larger than that size.
A couple of times when I was digging through the scraps I came across strip sets left over from some other project. I just treated them the same as if they were a single fabric and worked them right in. I even found some orphan blocks that I sewed together into a strip and incorporated. And if I had a piece of fabric I wanted in the center of the block but it wasn't long enough, I sewed another fabric to it and created a custom strip. The only thing I was careful about was making sure the very last strip in the corner wasn't too narrow; I didn't want a lot of seam bulk in that place, or a piece of fabric that was too small to really be seen once the sashing was added to the final blocks.

Once I had the 20 blocks I needed for the quilt finished I put them up on the design wall and laid them out in a pattern. Then I did a "background check." I turned each block over in place on the wall, so that I could see how all the different backing fabrics related to each other. I didn't want two pieces nearly the same color adjacent to each other, and I didn't want obvious directional fabrics turned sideways. I made the changes I wanted, then turned the blocks to the front again,
 rotating blocks as needed to recreate my original design.
Now I'm in the process of adding the sashing. I'm using the technique Sharon Pederson outlines in her book Reversible Quilts: Two at a Time, so I won't show all the steps. Here is the top row of the quilt with all the sashing strips machine stitched in place. All that's left is to hand stitch the free edge down. Since this is to be a charity quilt, and I'm interested in getting it finished (as well as pretty), I may opt for a machine zig-zag or other decorative stitch instead.

I have learned several things in the process of making this quilt. One is that I need another scrap bin for my more "mature" fabrics, the ones with more subtle colors. I have pulled several pieces out as I have worked my way through this quilt that just don't play well with this bright color palette. They will find their way into other types of quilts. I have also learned that I really like making this type of quilt. The blocks are like potato chips; you just have to have one more. And the best part is that I don't end up with yet another unquilted top to deal with; once it's assembled it's ready to be bound and done. And since my scrap bin is clearly overflowing, I know there will be more of these quilts made before the summer is over. Especially since the tornadoes seem to keep coming.
Tuesday, May 03, 2011
Today was not a quilting frenzy, but I did get a few things done. First I went through the pile of pieces I created in cutting super 9-patches last night and came up with a combination of center and larger border pieces. A fat quarter cut into 9-inch squares created the corner pieces, and another super-9-patch top is ready for quilting. That sent me into the flannel drawer looking for backings. I found some great possibilities, but once they were washed and dried, they were just a tad skimpy. I don't want to cut the tops down to fit, although that could certainly be done, so for now I put those away and I will look for alternate possibilities when I go to Monroe on Thursday. I need to remember to buy at least a yard and a quarter, if not a yard and a half in order to have the length I need.
While I was working on that top, I got an idea for using the rest of the fabric and some of my scraps as well. Since I already had some 9-inch squares, I went ahead and cut some more. Then I cut some batting a little bit larger, and created a top by sewing and flipping strips onto this foundation. Here is the result:


The process of sewing down the strips creates enough quilting through the back to hold things together. The blocks can then be joined together with sashing strips. The quilt I often nap under was made with this technique, and it has served me well for several years. Notice that I pieced the center strip to make it wide enough. The plan is for a quilt 4 blocks wide and 5 blocks long; that should be a good size for a child's quilt. I think for this one I'll make all the backs from different fabrics, but I may change my mind before I'm done.
So not exactly a frenzy, but forward momentum just the same. And since the scrap bin is overflowing at the moment, this idea comes at the right time.
Monday, May 02, 2011
The quilting frenzy of the past five days has finally blown itself out. Tomorrow I will do ordinary things like laundry and cooking and my job. But it sure has been good while it lasted.
Today I finished the Disappearing 4-Patch. It took about an hour to sew the chunks together, and another hour to add the borders, and it was done. I'll just say that some quilts are art, and I certainly consider some of the things that I have made to be art. Other quilts are just meant to do their job of providing warmth and comfort; this is definitely one of those quilts. But I like the technique, and I expect I will use it again in the near future; given the right mix of fabrics it could even be quite elegant.
Today I finished the Disappearing 4-Patch. It took about an hour to sew the chunks together, and another hour to add the borders, and it was done.
 I'll just say that some quilts are art, and I certainly consider some of the things that I have made to be art. Other quilts are just meant to do their job of providing warmth and comfort; this is definitely one of those quilts. But I like the technique, and I expect I will use it again in the near future; given the right mix of fabrics it could even be quite elegant.
I was quite proud of the fact that I managed to get the borders on with the orientation that I meant them to have. I wanted the text to read right side up toward the edge of the quilt, and that's what happened.  I know it doesn't show that way in the picture, but it really worked for real.
 I know it doesn't show that way in the picture, but it really worked for real.
Once that was done I pulled out the fabrics for the tessellated flowers and started cutting. Once I started sewing I realized I wasn't absolutely sure about my choice of size for the small triangle pieces. I had originally cut them 1-1/2 inches, half the size of the 3-inch block. But then they seemed a bit skimpy, and I wasn't sure. So it was time to make another set using 2-inch triangles. Here are the results of the two experiments: I'm still not sure.  I've decided to set that aside and just look at them for a while, then chose. I've also decided that this is going to be like the tilted stars and be a "leader and ender" project - one where the blocks get sewn in and around other projects. Once in a while a simple project is good to have around, but after a while it can become mind-numbingly dull if that's all I work on. So I'll have pieces cut and ready on the work table. When I run out of fabric I'll sew it together and see what I've got.
 I've decided to set that aside and just look at them for a while, then chose. I've also decided that this is going to be like the tilted stars and be a "leader and ender" project - one where the blocks get sewn in and around other projects. Once in a while a simple project is good to have around, but after a while it can become mind-numbingly dull if that's all I work on. So I'll have pieces cut and ready on the work table. When I run out of fabric I'll sew it together and see what I've got.
Once I set that project aside, then there was the question of what to do next. I remembered the Super 9-Patch baby quilts (http://www.quiltmaker.com/patterns_downloads/quiltmaker/patt230.pdf) that I've made in the past and remembered that I had bought a set of fabrics to make some for Taigen, only I made her another quilt instead and these got set aside. It was easy enough to pull out the fabrics and cut. If I had paid attention to where the fold was on the first set, the sewing would be easy as well. As it is, I've pulled some other pieces out of the scrap drawers to make some substitutions, and we'll see what we eventually end up with. The one I was able to complete from pieces that ended up (mostly) cut to the right size is this one: 

So at the end of 5 days I have 3 tops completed, 2 more that will just be a matter of figuring out what will fit together, cutting a few new pieces and sewing the 9-patches together, and the beginning of a lovely napping quilt for myself. The Tilted Stars and the Disappearing 4-Patch will go to the long-armer on Thursday for basting; the baby quilts will just get a flannel backing and I can handle those myself. I consider it a successful frenzy.
Sunday, May 01, 2011
Got a lot of sewing done today for a Sunday. It helped that it was picnic Sunday and I only had one service and that one here. The disappearing 4-patch isn't quite done, but I've gotten as far as sewing the blocks together into chunks of 4. So only a few seams to do tomorrow, then add the borders and I'm done. I even found a piece of flannel I like for the back, so I'll get it into the wash tomorrow to preshrink it.
I did find in sewing the blocks together that I had to pay more attention to orientation than I had thought at first. I should have done the pin in the upper left corner before I took anything down from the design wall, but I muddled through the hard way.
The one thing I did differently with this quilt that seems to have made a difference in the end was that I pressed the seams open. I know it violates some sort of rule, but with all the turning of pieces, I wasn't sure how the seams would end up in adjoining blocks. I think in the end it saved some grief. We'll see how it looks in the finished quilt.
Now I've worked too late and I'm tired. I'll finish up tomorrow and see what else I can get done before I have to deal with reality on Tuesday.
Saturday, April 30, 2011
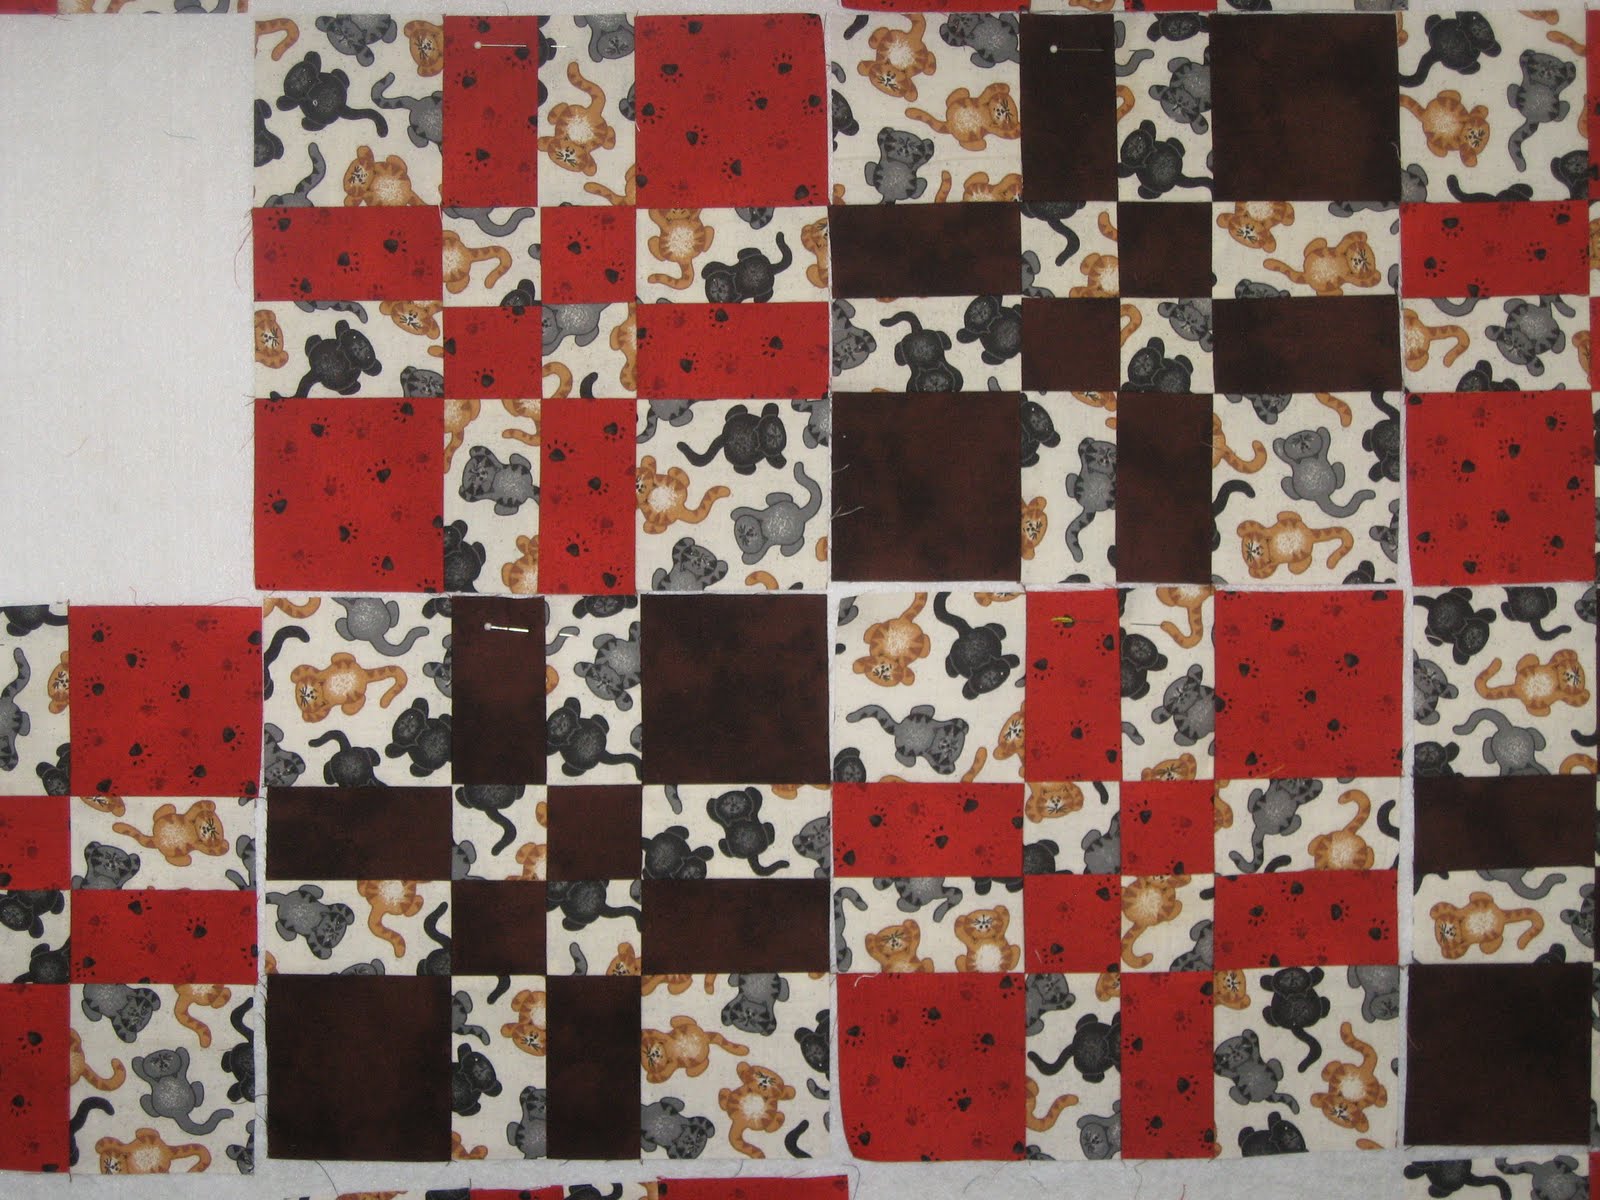
Today was a good day in the studio. I got more than half way through a disappearing 4-patch quilt that will probably go to tornado relief. It's a simple quilt that can be done with scraps or with yardage. I wanted the cutting to go quickly, so I chose a cat print that I wanted to put to good use, then chose a couple of coordinates.
Here's the process, more or less. If you want to see more, there are several other tutorials out there on the web, such as: http://sewwonderful.blogspot.com/2010/02/disappearing-4-patch-or-4-to-9-patch.html. You start with a 4-patch. I started with 6-inch squares. The only rule about fabric selection is to avoid anything directional, unless you don't mind part of the design being upside down. I was amazed how many of the cat prints in my collection had all the cats pointing in the same direction. I'll have to look for some that are non-directional.
Once you have a 4-patch, you lay it on the cutting board and proceed to cut it into a 9-patch. I decided to measure out 2 inches on each side of the center seam, but the measurement is really arbitrary. After I had the block assembled, I thought maybe 1-1/2 inches might have been better, but I wasn't going to waste a finished block.
Once the 4-patch is cut into 9-pieces, take the middle piece on each side and rotate it 180 degrees. You end up with something that looks like this:
Then all you have to do is sew it together like any 9-patch, and you're done. Add a bunch of other blocks and you have something like this:
A couple of thoughts about the cutting of the 4-patch. This is definitely a time where "measure twice, cut once" comes into play; don't ask me how I know this. The other thing is that you really don't want to pick up the pieces part way through cutting the block. I have a small cutting board (it shows green on top of my big blue mat in the pictures) that I can rotate so I don't have to stand on my head to cut in the horizontal. It also helps that I can use a rotary cutter equally well in either hand, but that's not essential.
This quilt will end up with 24 blocks, plus a border if I can find something in stash that I like. I suspect this will be a place to use one of the stripes or directional prints I rejected as my main fabric. I'm hoping to have the whole thing put together by the end of the day tomorrow. I have another new project waiting in the queue that I'm itching to start on, so I want this one off the design wall as soon as possible.
Here's the process, more or less. If you want to see more, there are several other tutorials out there on the web, such as: http://sewwonderful.blogspot.com/2010/02/disappearing-4-patch-or-4-to-9-patch.html. You start with a 4-patch. I started with 6-inch squares.
 The only rule about fabric selection is to avoid anything directional, unless you don't mind part of the design being upside down. I was amazed how many of the cat prints in my collection had all the cats pointing in the same direction. I'll have to look for some that are non-directional.
Once you have a 4-patch, you lay it on the cutting board and proceed to cut it into a 9-patch.
 I decided to measure out 2 inches on each side of the center seam, but the measurement is really arbitrary. After I had the block assembled, I thought maybe 1-1/2 inches might have been better, but I wasn't going to waste a finished block.
Once the 4-patch is cut into 9-pieces, take the middle piece on each side and rotate it 180 degrees. You end up with something that looks like this:

Then all you have to do is sew it together like any 9-patch, and you're done. Add a bunch of other blocks and you have something like this:
A couple of thoughts about the cutting of the 4-patch. This is definitely a time where "measure twice, cut once" comes into play; don't ask me how I know this. The other thing is that you really don't want to pick up the pieces part way through cutting the block. I have a small cutting board (it shows green on top of my big blue mat in the pictures) that I can rotate so I don't have to stand on my head to cut in the horizontal. It also helps that I can use a rotary cutter equally well in either hand, but that's not essential.
This quilt will end up with 24 blocks, plus a border if I can find something in stash that I like. I suspect this will be a place to use one of the stripes or directional prints I rejected as my main fabric. I'm hoping to have the whole thing put together by the end of the day tomorrow. I have another new project waiting in the queue that I'm itching to start on, so I want this one off the design wall as soon as possible.
Friday, April 29, 2011
The March retreat ended up being pretty much a bust. I got nothing of any significance done, and for no good reason except that I kept getting sidetracked with trivia and never really got in the groove.
But this weekend, while not a official retreat, seems to be making up for it. Both yesterday and today I've made good progress, and since the rest of the weekend seems to be relatively quiet, I should be able to continue on as I have begun.
The Tilted Stars is finally assembled. I am insanely proud of the fact that I did not screw up the sewing of the directional print on the borders, and did not have to undo something sewn on wrong side up. I won't swear that all the pieces ended up in the places I had planned, but so far I've only spotted one instance of neighboring blocks having the same fabric.
  Since I think the quilt will be fun as an "I Spy" for a kid, that can be one of the things to look for. I got the backing fabric earlier this week, so on Thursday, when I have to go that way anyway, I will take it to the long-armer and have it basted. With all the tornados lately I know there will be calls going out for charity quilts, and this one is big enough to cover a bed, so I hope somebody will love it and be comforted by it when it's finally bound and ready to go.
Now I have to decided what to work on next. The Yellow Brick Road is at least half quilted, and for the same reasons, I am feeling compelled to finish it. But I don't want to start on it until morning; I want to be fresh when I work on something that's a bit outside my comfort zone. I have a couple of ideas for scrap quilts, but I suspect I'll spend most of the night cutting and not get a lot of actual sewing done. I guess I'll just pull out some boxes and see what strikes my fancy. There should be something I can finish and maybe take to the longarmer with Tilted Stars.
But this weekend, while not a official retreat, seems to be making up for it. Both yesterday and today I've made good progress, and since the rest of the weekend seems to be relatively quiet, I should be able to continue on as I have begun.
The Tilted Stars is finally assembled.
 I am insanely proud of the fact that I did not screw up the sewing of the directional print on the borders, and did not have to undo something sewn on wrong side up. I won't swear that all the pieces ended up in the places I had planned, but so far I've only spotted one instance of neighboring blocks having the same fabric.
  Since I think the quilt will be fun as an "I Spy" for a kid, that can be one of the things to look for. I got the backing fabric earlier this week, so on Thursday, when I have to go that way anyway, I will take it to the long-armer and have it basted. With all the tornados lately I know there will be calls going out for charity quilts, and this one is big enough to cover a bed, so I hope somebody will love it and be comforted by it when it's finally bound and ready to go.
Now I have to decided what to work on next. The Yellow Brick Road is at least half quilted, and for the same reasons, I am feeling compelled to finish it. But I don't want to start on it until morning; I want to be fresh when I work on something that's a bit outside my comfort zone. I have a couple of ideas for scrap quilts, but I suspect I'll spend most of the night cutting and not get a lot of actual sewing done. I guess I'll just pull out some boxes and see what strikes my fancy. There should be something I can finish and maybe take to the longarmer with Tilted Stars.
Monday, March 14, 2011
And since that retreat I've hardly had time to pick up knitting needles, let alone focus on quilting. Of course, part of what made that time so productive was that I specifically designated it as quilting time, and gave that priority over all the other demands on my time.
So I'm doing it again. Thursday is the start of the NCAA basketball tournament, and it's the perfect time for a quilt retreat. I don't know that I'll get in quite as much time over 5 days as I did in February, but that doesn't matter. The point is to set a time and a goal, and work toward accomplishing it.
MJ will be here, and that can be both good news and bad news. I know she wants to put a few stitches into the DWR, so we can work on that for a while. And I really want to show her Kay's new shop in Vicksburg, so I may have to kidnap her for an afternoon and drive down there. I'm sure I can find something that I desperately need that will justify the time and the gas to go there.
So what about goals? Here's a good start:
1. Finish sewing the Tilted Stars together. Half of it is in blocks of 16 already, and the layout is fixed, so that should be doable.
2. Put in 5 hours on the DWR (1 per day). I think my fingers are up to this.
3. Finish the embellishment of the Spring Wall Hanging. Most of this is hand-sewing and fiddling until I get a layout I like.
4. 15 minutes per day of cleaning.
5. Finish quilting the Yellow Brick Road.
That should be more than enough to keep me busy for the weekend. Not that I might not pull out something else that looks interesting.
Monday, February 07, 2011
The retreat is officially ended. I knew this afternoon it would end when the last disc of the audiobook "Eat, Pray, Love" by Elizabeth Gilbert ended; to try to listen to something else and continue sewing would be anticlimactic. And I was coming to the end of what I wanted to accomplish for the weekend as well. So it's over. And I'm pleased with the result.
The Christmas project is 2/3 done. I finished the last bit of that sewing this afternoon, and have now set it aside so I can work on other things for a while. It hasn't gone far; I haven't made a project box for it. It's good sewing for a day when I don't want to have to think too much. But it's time to look at something different.
I've started sewing the Tilted stars together. I posted a picture of this quilt when I first put it up on the wall on November 8th (wow! November!), and I didn't take a new picture today before I started sewing. I'm putting 16 blocks together, so the final assembly will be 3 units wide and 4 units long. It's easy sewing; nothing matches except at the corners. All I have to do is remember which way is up, and which side is left.
I did another hour, give or take on the DWR. My fingers are starting to toughen up, but today my back was hurting some, so I didn't try to push.
That left the spring wall hanging, and it didn't get as much attention this weekend as it probably deserved, but it didn't get totally ignored. For the record, this is the way it looked at the beginning of the day :
:
The problem is the block in the upper right with the flowers on it. This one:
It's got sweet yo-yo flowers and dimensional leaves, and I love the way it looks. But it's the only dimensional thing on the quilt, leaving the rest of it looking a bit - well - flat. The obvious solution is to add more dimensional embellishment, but that means getting creative, and that's when my anxiety level goes up and I start sewing tilted star blocks together instead.
But I had gotten so far as to assemble a basket of fabrics and doo-dads and stuff that I thought I might be able to use some day. At some point I had made this sweet origami flower:

I think with some leaves or something around it, it will fit quite nicely into the Ohio Star block. In fact, there's a piece of lime green ribbon in there that might take ruching quite nicely. So there's the beginning of one solution.
Then I got into the drawer of yo-yo makers and got out the one that makes flower shapes. I'm thinking that 3 of those, with a couple of leaves, will nicely fill the basket. So with just an hour of work, I was able to pin a couple things onto the quilt and begin to see possibilities.

So not a finished project, but one that might be ready for sandwiching and quilting in a fairly short time. I'm hoping to find some time to work on it this week; there's another snow forecast for Wednesday, and that might help.
Saturday, February 05, 2011
I guess today was the payoff for the past two days, because today things began to come together. The work I had planned on the Christmas gift project is nearly done; I have about 2 more hours work on that and I will be where I want to be at the end of the retreat. In the course of the piecing today I got out the "leaders and enders" project I had worked on while I was piecing the DWR; I have a plan for those blocks when I have enough of them, so it made more sense to stick those blocks in the string instead of pieces of waste fabric. I kept having to stop and add more fabric to them, so it made sense that the "real" project was getting done too.
I also took advantage of a nice sunny afternoon and decent light to work on the Tilted Stars. I think it's at the stage where I'm ready to call the layout "done." I can see places where I might tweak it, but it's going to be hard to come up with a layout where two blocks of the same fabric aren't at least in the same neighborhood. And the overall effect looks balanced. So it's time to quit obsessing about getting it perfect and just start putting it together. It's a kid's charity quilt after all; perfection is not a requirement. I'll take it down from the wall in 4x4 sections, photograph the sections as I lay them out on the flannel board, and hope to get them put together the same way I have them laid out now. I make no guarantees, knowing me. But I can at least try.
I did another stint on the DWR, also taking advantage of good daylight. I'm nearly to the next corner, another marker of progress. I think the plan to quilt close to the edge, then bind the quilt and secure the edges is still a good one. Maybe with forward progress on a nearly daily basis I can get there by the end of February.
That leaves just the spring wall hanging untouched of the projects planned for this weekend. And in a moment of serendipity, there was a segment on ruching on "Sewing with Nancy" this morning, a technique I have thought about incorporating into the quilt. I suspect I will not get to this project until Monday, because there will not be a lot of sewing time tomorrow, and I will probably use it to move the Christmas project off the list. Ultimately I think it will be a process of auditioning things and making choices. That means trusting my creative instincts, always difficult for me. On the other hand, I'm getting tired of seeing this at the top of my UFO pile; I'd much rather see it finished and hanging on the wall.
Friday, February 04, 2011
I have no idea where the time went today, but I ended up with precious little time to quilt. Trini came to clean this afternoon, and of course I had to pick up around the house to be ready for her. I cooked pork chops this morning, and got the roux ready to make gumbo tomorrow. After Trini left I realized it was the 4th and if I didn't pay my water bill today it might get cut off, so that meant going out in the rain and slop. Then "Funny Girl" was coming on, and of all the movies on today, I wanted to watch that one. The next thing I knew it was 7:00 and I hadn't been in the studio yet. 


I did manage about 15 minutes on the DWR. It was just before the movie came on, and so the last of daylight. The pictures are from yesterday. Taking a picture of my own hand seemed like the most logical way to prove that I had actually been quilting. But of course I couldn't stitch while I was trying to focus the camera, so it ended up being just as staged as if I had never taken a single stitch in the quilt. And then Bart came to help out gravity, and I tried taking a picture of him. But of course he's all black, and when he turns his face to the camera he ends up with "demon eyes."
When I did finally get to the studio I realized that my left shoulder had been aching all day. This is the one I injured in the accident years ago, and a cold damp day got to it. Even moving pieces from their stack to the sewing machine was causing me pain, and it was a kind of repetitive motion. So I worked through one side of a CD, then decided to just tidy up and get ready for tomorrow. Here's the table all set with cut pieces and partially assembled components, all ready to go. My glasses are even there waiting for me.

So I'm about to take some ibuprofin and head to bed. I have work to do tomorrow, but I plan to start the day in the studio. Saturday morning usually brings sewing and quilting programs to PBS, so I'll start with those, then get on with Sunday preparation. I really want to get into the studio in daylight and work on the placement of the Tilting Stars blocks, and tomorrow seems to be the day to do that.
Subscribe to:
Posts (Atom)